How to Change Your Hockey Skate Blades
05 27 2025
When you’re prioritizing the physical attributes of your performance, it can be easy to overlook things like blade care. But whether you’re a seasoned vet or a new player (or parent), investing in proper blade care can take your game to new levels.
We’ve put together a guide to walk you through exactly how to change hockey skate blades, complete with the signs to look for, the tools to use, and how to care for your skates afterward.
The Importance of Proper Skate Blades
Your skate blades directly affect your ability to move efficiently. Well-maintained blades help you skate faster and turn sharper, building confidence every time you step on the ice.
Dull, damaged, or poorly fitted blades can compromise:
- Speed: Clean, sharp edges maintain your velocity.
- Turning Ability: Good blades allow for tighter turns.
- Edge Control: Precision edges help with your balance, stopping, and quick direction changes.
Factors like the blade’s profile and sharpness have an outsized impact on these areas. That’s why timely blade replacement is more than just maintenance; it’s a safety and performance imperative.

Identifying the Right Type of Skate Blade
Before you learn how to change Bauer skate blades, or those from any other brand, you need to know what kind of blades you’re working with.
- Standard Steel Blades: These are common and affordable, offering solid durability for most players.
- Stainless Steel Blades: Known for their rust resistance and longevity, they’re ideal for players seeking fewer replacements.
- High-Performance Blades (e.g., Titanium): Lightweight and extremely durable, these blades are designed for high-level play and quicker turns — but they come at a premium cost.
Each material type has its own benefits depending on your skill level, frequency of play, and budget. Choosing the right blade gives you a performance edge (literally), setting the foundation for a smoother, safer skating experience.
How to Know When to Change Your Skate Blades
Unfortunately, blades don’t last forever; even high-quality steel will wear down from friction, contact with the boards, and regular sharpening, all of which gradually reduce performance.
Watch out for these warning signs:
- Visible wear: Chips, cracks, or nicks along the edge.
- Dullness: Frequent sharpening with minimal improvement.
- Performance issues: Less grip during stops, reduced agility, or poor glide.
Experienced players can often “feel” when something’s off, while beginners might notice difficulty with edge work and parents might spot slipping during gameplay. Regular visual checks are a proactive way to prevent issues before they ever impact safety or performance.
Tools and Materials Needed for Blade Replacement
Before you start swapping out your blades, take some time to set up your workspace and tools. Here’s what you’ll need to replace a Bauer skate blade at home:
- A skate blade replacement tool or Allen wrench (depending on skate model)
- New replacement blades (make sure they’re compatible with your skate holder)
- A clean towel for drying and wiping
- Protective gloves (optional, but good for safety)
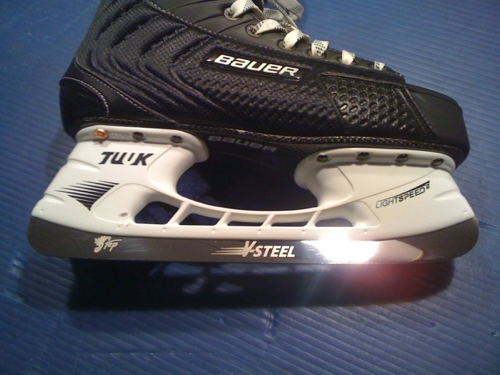
Some skates — especially modern Bauer models — feature trigger-release systems like the Bauer Tuuk Lightspeed Edge, which allow tool-free blade replacement. Having the correct gear on hand not only makes the process smoother but also helps prevent injury or damage to your skates.
How to Change Your Skate Blades: Step-by-Step Guide
Step 1: Identify Your Skate’s Blade Holder Type
The first step in replacing your blades is knowing exactly what kind of holder system your skates are equipped with. Most Bauer skates use the Tuuk Lightspeed Edge holder; others may have traditional screw-in holders.
- For Bauer’s Edge system: Look for the trigger on the heel of the holder.
- For screw-in models: Locate the screws on either side of the holder.
Step 2: Remove the Old Blade
Once you’ve identified your holder type, it’s time to safely remove the worn-out blade.
- Edge Trigger Holder: Push the trigger inward using your thumb until the blade pops out.
- Screw Holder: Use your tool to loosen the screws, then slide the blade out.
Pro tip: Always remove and replace blades in a clean, dry environment to avoid dirt or moisture contamination.
Step 3: Insert the New Blade
Next, line up your new blade carefully and get ready to lock it into position.
- Slide the new blade into the holder until it locks in place.
- With Edge systems, you’ll hear a “click” when it’s secure.
- For screw holders, tighten the screws evenly on both sides.
Step 4: Inspect the Alignment
Before hitting the ice, take a moment to confirm that everything’s properly aligned. Double-check that the blade is:
- Sitting flush in the holder
- Not loose or misaligned
- Free from debris or gaps
Misaligned blades can impact your stride and cause injury, so don’t skip this step! Even a slight misalignment can throw off your balance and hinder your ability to turn or stop safely.
Maintaining Your New Blades
Once your new blades are in, routine maintenance is the surest way to keep them sharp and safe. Keep these best practices in mind:
- Dry them thoroughly after each use to prevent rust. Use a clean towel, then let the skates air out.
- Store your skates with soft blade covers (guards) to protect edges.
- Follow a regular sharpening schedule. How often should you sharpen your skates? A rule of thumb is every 8–10 hours of ice time, but it can vary by player and preference.
Even experienced players and equipment techs run into issues, but the most common ones are easy to troubleshoot. Blade won’t lock in? Check that it's the correct blade model for your holder and try reseating it. Blades feel loose? Check the screws and re-engage the locking mechanism. Skates feel “off?” Check for alignment; a fresh sharpening may also be required.
For more info on keeping your blades at their best, check out some of our other resources:
Why Blade Care Matters
Blade selection isn’t some one-size-fits-all process; it’s an opportunity to maximize comfort, control, and most of all, your personal skating style. Regardless of skill level, regularly maintaining and replacing your blades boosts your on-ice performance, prevents unnecessary injuries, and extends the life of your skates.
Learning how to change hockey skate blades and care for them ensures you’re always equipped for peak performance — whether it’s a weekend pickup game or a championship showdown.